How to: Set Up License Manager
In this article
When the Upgrade License Manager process is triggered, use the Subscription Setup page to manage the subscription license for your LS Express environment.
This setup defines how your POS (Point of Sale) and PAY (LS Pay) units are validated, activated, and managed under a valid subscription.
To open the Subscription Setup page:
-
Open the Administration page.
-
Select Navigate, and then choose Subscription.
Actions bar
| Action | Description |
|---|---|
| New > Fix License key | Select to fix the license key. |
| New > Reset Subscription | Select to reset the subscription and delete all the related data. |
| License Instance Type | Select to open the License Setup for viewing or editing license instance details. When the dialog page opens, choose the Environment Type (Test or Production). |
| Validate Subscription | Select to validate the subscription with the LS Retail license service. |
| Deactivate License | Select to deactivate the active license instance. A prompt appears if devices are still in use. You have to deactivate the devices first and try again. |
| Log Details | Select to open a log showing previous license validation records. |
| Related > POS Units Activated Elsewhere | Select to view POS units that are activated elsewhere. |
| Related > PAY Units Activated Elsewhere | Select to view PAY units that are activated elsewhere. |
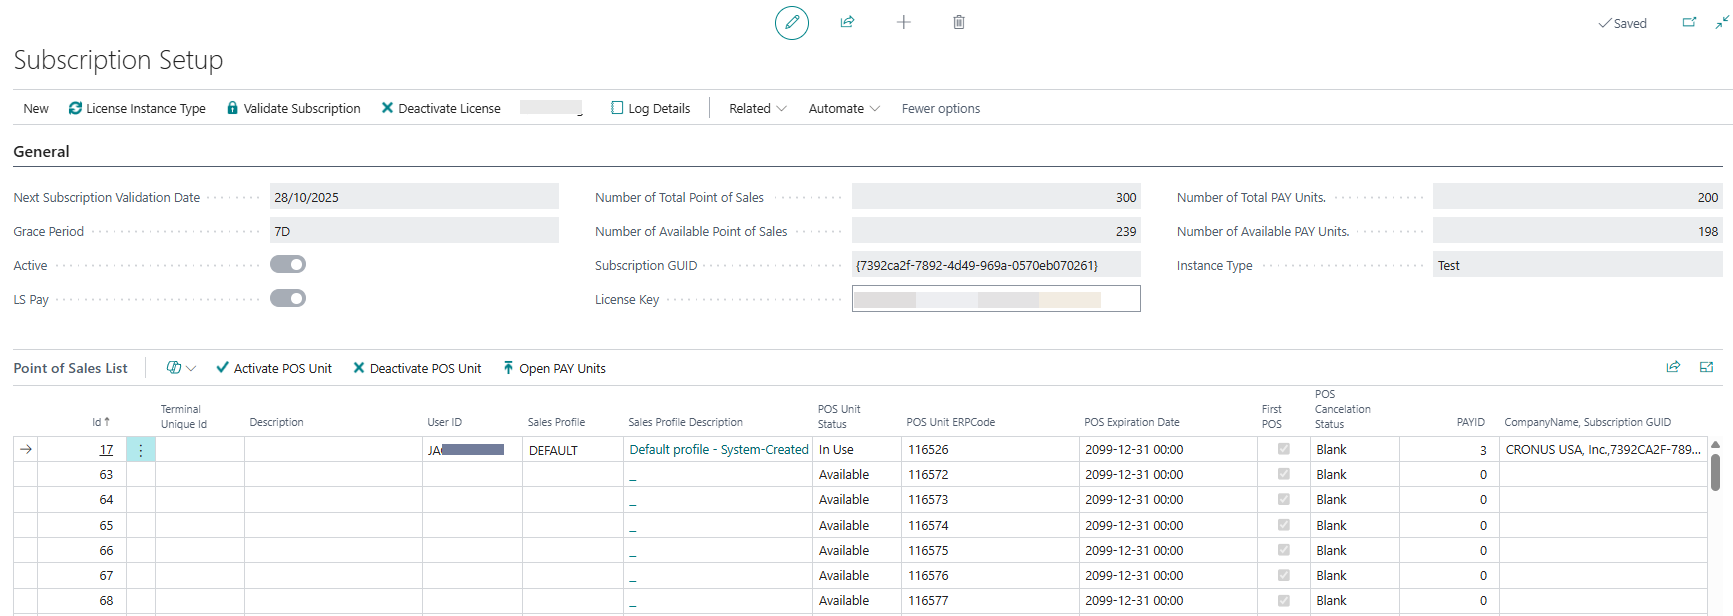
General FastTab
The General FastTab displays the main information about your subscription, including the validation date, license key, and number of available POS and PAY units.
| Field | Description |
|---|---|
| Next Subscription Validation Date | Indicates when the License Manager tool will run the synchronize with customer D365 BC SaaS environment. During this process, it will verify whether the number of activated units remains unchanged or has been adjusted due to additional orders or cancellations processed by the LS Retail Licensing department. |
| Grace Period | Indicates how many days the system remains active after the validation date expires. |
| Active | Indicates that the current license subscription is active or not. |
| LS Pay | Indicates that the LS Pay functionality of your subscription is active or not. |
| Number of Total Point of Sales | Displays the total number of POS units allocated in the subscription. |
| Number of Available Point of Sales | Displays how many POS units are still available for activation. |
| Subscription GUID | The unique identifier that represents the active license subscription. |
| License Key | The license key issued after the purchase of LS Express license. Required for activation. If you are installing the LS Express for the first time, the trial version is automatically communicates with the latest License Manager. Note: In the trial version, the license key will display as all zeros. When the trial period ends, enter the license key provided by LS Retail License team (also visible on Business Hub) to continue using LS Express. Important: In the trial version, you are not allowed to validate the subscription. Validation is only applicable for non-trial licenses. |
| Number of Total PAY Units | Displays the total number of PAY units included in the license. |
| Number of Available PAY Units | Displays how many PAY units remain unassigned or unused. |
| Instance Type | Indicates the subscription type, for example Test or Production. |
Point of Sales List FastTab
This FastTab lists all POS units that belong to the current subscription. Each units shows its license status and ERP reference details.
| Field | Description |
|---|---|
| Id | The unique identifier for the POS unit. |
| Terminal Unique Id | The unique key that identifies the POS terminal in the system. |
| Description | A short description of the POS unit. |
| User ID | The assigned POS user ID. |
| Sales Profile | The sales profile applied to this POS. |
| Sales Profile Description | The description of the sales profile, for example Default profile - System-Created. |
| POS Unit Status | Indicates whether the POS unit is In Use or Available. |
| POS Unit ERP Code | The ERP reference code for the POS unit. |
| POS Expiration Date | Shows the expiration date of the LS Express POS license and it must be renewed before that date. |
| First POS | Indicates whether this POS is the primary POS for the company. |
| POS Cancelation Status | Displays the current cancelation status, for example Blank if active. |
| PAY ID | Identifies the PAY unit Id linked to this POS Unit. |
| Company Name, Subscription GUID | Displays the company name and the corresponding subscription GUID. |
Actions on the POS List
| Action | Description |
|---|---|
| Activate POS Unit | Select to activate a POS unit under the current license. |
| Deactivate POS Unit | Select to deactivate a POS unit, freeing up the license slot. |
| Open PAY Units | Select to open the PAY Units List associated with the subscription. You can manage your PAY units on the PAY List page. |
| POS Unit Cancelation | Manage your cancelation status to:
To be Canceled or
Blank (only if the current status is To be Canceled). Note: After the status is set to "To be Canceled", the License Manager team can update the status to Confirmed to be Canceled or Cancelation Completed. If the status is set to Confirmed to be Canceled or Cancelation Completed, it can no longer be modified. |
PAY Units List
The PAY List page opens when you select Open PAY Units from the Subscription Setup page. This page displays all the LS Pay units available under the current subscription. You can review the activation status, expiration date, and license information for each PAY unit.
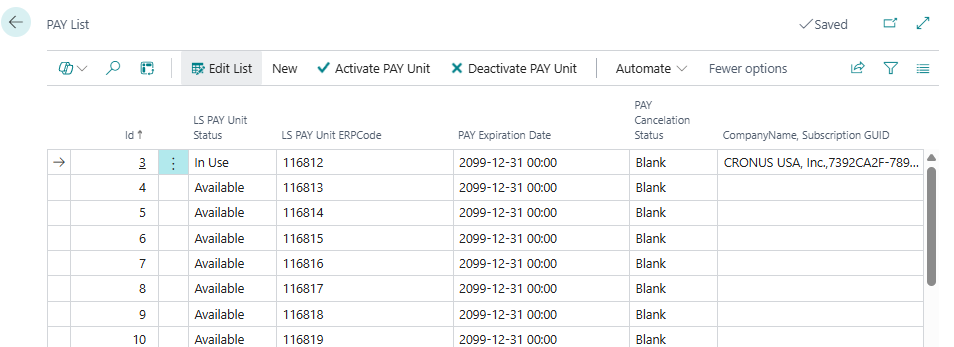
Actions on the PAY List
| Action | Description |
|---|---|
| Edit List | Allows you to modify or review PAY unit details directly in the list. |
| New > PAY Unit Cancelation | Manage your cancelation status to:
To be Canceled or
Blank (only if the current status is To be Canceled). Note: After the status is set to "To be Canceled", the License Manager team can update the status to Confirmed to be Canceled or Cancelation Completed. If the status is set to Confirmed to be Canceled or Cancelation Completed, it can no longer be modified. |
| Activate PAY Unit | Select to activate a selected PAY unit under the current license subscription. |
| Deactivate PAY Unit | Select to deactivates the selected PAY unit to release it for another POS unit. |
PAY List
See also